Resetting Your TP-Link Extender: A Comprehensive Guide
Are you struggling with your TP-Link extender and looking for a way to reset it? Resetting your TP-Link extender can help resolve various issues, such as connectivity problems, slow speeds, or outdated firmware. In this detailed guide, I will walk you through the process of resetting your TP-Link extender, covering different methods and their implications. Let’s dive in!
Understanding the TP-Link Extender

Before we proceed with the reset process, it’s essential to understand what a TP-Link extender is and how it works. A TP-Link extender, also known as a Wi-Fi range extender, is a device designed to extend the coverage of your existing Wi-Fi network. It works by connecting to your main router and rebroadcasting the signal to areas where the original network is weak or non-existent.
TP-Link extenders come in various models, each with its unique features and capabilities. However, the basic principle remains the same: to provide a seamless and reliable Wi-Fi experience throughout your home or office.
Why Reset Your TP-Link Extender?

Resetting your TP-Link extender can help resolve several issues, including:
-
Connectivity problems: If your extender is not connecting to your main router or if you’re experiencing intermittent connectivity, a reset might help.
-
Slow speeds: Sometimes, your extender might not be functioning optimally, leading to slow speeds. Resetting it can help improve the performance.
-
Outdated firmware: If your extender’s firmware is outdated, it might not be compatible with your router or might lack essential features. Resetting it to factory settings can help update the firmware.
-
Configuration issues: If you’ve made changes to your extender’s settings and are now facing problems, a reset can revert the settings to their default values.
Resetting Your TP-Link Extender: The Methods

There are two primary methods to reset your TP-Link extender: the hardware reset and the software reset. Let’s discuss each method in detail.
Hardware Reset
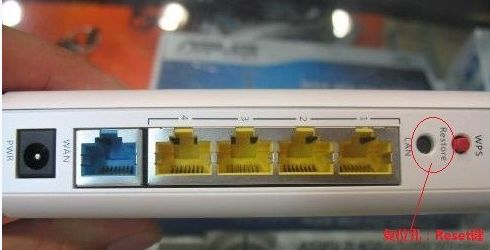
The hardware reset is the most straightforward method to reset your TP-Link extender. Here’s how to do it:
-
Locate the reset button on your TP-Link extender. It is usually located on the back or bottom of the device.
-
Using a paperclip or a similar object, press and hold the reset button for about 10 seconds.
-
Release the button once the device’s indicator lights start blinking.
-
Wait for a few minutes for the extender to reset and restart.
After the reset, your extender will revert to its factory settings, and you will need to reconnect it to your main router and configure it again.
Software Reset
The software reset is another method to reset your TP-Link extender. This method involves accessing the extender’s web interface and performing a factory reset. Here’s how to do it:
-
Connect your computer or mobile device to the extender’s Wi-Fi network. The default SSID and password are usually printed on the device or in the user manual.
-
Open a web browser and enter the extender’s IP address. The default IP address is usually 192.168.0.254.
-
Log in to the extender’s web interface using the default username and password. The default username is often “admin,” and the default password is also “admin” or “tp-link.” If you’ve changed the credentials, use the new ones.
-
Once logged in, navigate to the “Management” or “Settings” section.
-
Look for the “Factory Reset” or “Restore Factory Settings” option and click on it.
-
Confirm the reset by clicking “OK” or “Apply.” The extender will now reset to its factory settings.
After the reset, your extender will revert to its factory settings, and you will need to reconnect it to your main router and configure it again.


